I knitted my very first pair of socks using 5 dpn, the traditional way to knit socks. Although the socks came out great for a first timer in socks knitting; however, I wanted to have an easier way to knit socks. Then a year ago, I heard about people talking about the Magical Loop method, I also heard people saying about knitting a pair of socks using 2 circular needles. I wasn't sure how I felt about the magical loop method when I first heard it... but since handknitted socks are in everyone wish list for the holiday, I was willing to try different method to knit socks faster. I finally did some research on the magical loop method and try it. And I totally love it. Since mastering the skill, I have knitted more than 10 pairs of socks and I also using magical loop method method for fingerless mitten, gloves and hat. Since most of the socks patterns are written in 5 dpn, so I converted a basic sock pattern to use the magic loop method. I have so much fun knitting socks and mittens, I have started designing pattern for socks and gloves for using this method.

To see whether the magical loop is a better method than 5 dpn, I have tested in a seasoned knitter, my mother. She have been knitting for more than 40 years. She knitted everything using dpn and she believes it's easier to use dpn to knit in the round. When I taught her the magical loop method, she hesitated. She tried the first pair of gloves using magic loop, and when the gloves was finished, she absolutely loves the new way. I figured if I can change my mother's mind, then the magic loop method is indeed a good alternative to dpn for socks, mitten etc...

In case anyone who is not familiar with the magic loop method, a magic loop is actually a long circular needle with very flexible wire.

Following is the instruction of the magic loop method:
1. Cast on an even number of stitches and slide stitches to middle of cable.
2. Divide stitches in half and pull cable loop out between two groups of stitches
3. Slide stitches down to their respective needle tips. you will have half of your stitches on each needle tip. Hold needle tips parallel and pointing to right, working yarn will hang from back stitches. Place a market on the front group of stitches to mark the begining of the round.
4. Pull back needle tip out until you have enough cable to allow you to work stitches on front needle.
5. Work all stitches on front needle, being careful not to twist.
6. Slide two groups of stitches back to their respective needle tips. Repeat step 4 as many times as needed.

The magic loop method might seem a little bit difficult at first, but once you get used to the needle pulling back and forth. It is going to be a good alternative to dpn to work a small circle.
 
Picture
I always have a few projects to put aside for myself to work on when
1. I have a mind block during design submission;
2. when I am sitting in front of the TV with a sleeping baby in my arms;
3. Try to use some of my yarn stash;
4. To finish some straight forward projects such as socks for my nephew for the next holidays or some simple project that I can work on without referring to pattern all the time.

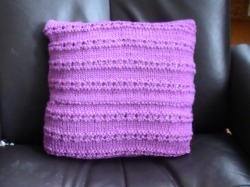
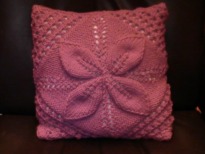
The above cushion I started a couple weeks ago while I was looking through my magazine and pattern book to get inspiration for my upcoming submission. As I was flipping through Nicky Epstein's 'Knitting never felt better', I saw this pattern and I thought it would look nice as a cushion cover.

The front cover is made in 4 identical pieces and sew together; as for the back, it is made in 2 separate pieces by picking up stitches from both end. The 2 back pieces are overlapped in the middle to create a little opening for easy cushion insert. I use a rather simple motif for the back cover, it's a combination of stockinette stitch with a row of eyelet. I have included a picture of the back cover. Since the pictures were taking in different time; hence, the color seems quite different even they are the exact same color. I am on the process of dropping down the pattern and will publish it once it is available.

Picture
 
Picture
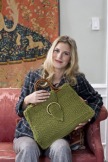
I have gotten quite a bit of questions about the Positano Tote that was published in Interweave Winter 08 issue and I would like to create this FAQ post for anyone who is interested in the pattern or have already purchased the pattern or already started the project and would like to get some tips and information about the pattern and the project.

1. Where can I found the handle?
The pattern has included the url where the handles were purchased. However, the website is not that user friend to navigate and if you call the company, they would tell you that the handles is no longer available. However, if you go to the following link that I listed below, you can get the exact same handles that I used on the sample that I submitted to the magazine.
http://www.umx.info/ProShop/ProductDetail1.asp?ProductRecordset1_Position=FIL%3AItemNo+LIKE+%27HR%2A%27ORD%3AABS%3A4KEY%3AHR%2DDM12%2FeachPiecePAR%3A

2. Can I substitute the handle? If yes, what is the best substitution?
The answer is Yes. Since the tote is lined with plastic canvas; hence, it's quite  sturdy througout. You can get a U-shape handle does not have the body rod. If you use a U-shape handle, when working on the purse tab, just work the center piece, and ignore the side 2 tabs.

3. Where can I find the buckle? Can I use a different size buckle?
The buckle I used is a buckle from an old belt that does not fit me anymore since I have gained a few pounds. If you can't find any buckle with the same size, there is a few option you might want to consider;
1. See whether you can find an cheap belt with the same size buckle, 2. Find a buckle that you like and try to modify the purse flap to work with the buckle; e.g. if the buckle is smaller than the pattern is called for, you might want to do more decrease to the flap;
3. Not to use any buckle so do have to work the tote flap. 

4. Do I have to use knit-in (attached) i-cord for the side seaming?
No. I like knit-in i-cord because it give a round edge and it gives the tote a more finish look. You can either use tapestry needle and yarn to sew the seam together or use crochet hock to work a couple rows of single crochet to combine the tote together.

5. Do I have to put plastic canvas to the tote? Do I have other option?
The answer is no BUT I would highly recommend to use plastic canvas because it will really increase the durability of the tote. Also, the way the tote is designed, it meant to be and look sturdy. Another option I would suggest is to use home decorative fabric along with heavy interfacing when lining the purse, that would provide a little more sturdy look and feel to the tote.

6. Do I have to apply plastic canvas to the tote before assembly the pieces together? Can I do it other way around?
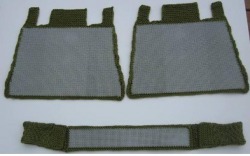
Yes, you would but it might get a little bit tricky to do it the other way. if you assembly the pieces together before applying the plastic canvas, you will have to first turn the tote inside out, then apply the plastic canvas to the body and the bottom, the tricky part is to turn the tote outside in again since the plastic canvas made the tote very stiff; hence, it's difficult to turn. So I would suggest to assembly the tote first. I have attached a picture below about applying the plastic canvas. make sure to leave about 1/4-1/2 inch so that you can work the knit-in i-cord.

7. My tote come out way smaller than the finished measurement stated in the pattern even though I have the right gauge, what's wrong?
I did hear quite a few people told me that the actual size come out way smaller. The key is that you will really need to stretch the body pieces out when blocking because of the nature of the motif, it tend to pull the pieces in. In addition, when working on sl 1 wyf, not to pull the yarn too tight. If you are pulling it too tight while working on the stitch, it will make the over tote smaller. If you realized that the size for the tote is smaller than what it was stated on the pattern, then you will need to modified the bottom piece. You might want to consider to drop a needle size when working on the bottom (not the side) or may be even cast on a few less stitches. I would recommend to do a gauge on the garter stitch to see how many CO you need to match the widest part of the body.

I hope this post povide enough information about working on the Positano Tote. If you still have anymore question, please contact me by going to the 'Contact Me' link under 'About Kaleido' option.

Thanks you everyone that is interested in this design and I wish you Happy Knitting!

Picture
The body and bottem lining of the tote.
 
I have finally finished the fundamental of my site and I decided to publish live to the internet.

I urged everyone to drop by and look around. I would appreciated any feedback you might have. I am on the process of adding more information to the site; the 'Tips & Tricks' section is very light at this point and my blog need a lot more work. My only problem is time. Currently I realized that the only time I have to update this site is when everyone are in bed and most often is usually rather late at night. But I promise to keep this site updated as often as I can.

It's now almost 11 pm and it's time for me to get to bed even though I have tons of sketch to do. So much to do and so little time.. it's always the case at least for me.

Signing off... cheers and please pray for the people in Haiti! 
 
Hello everyone! I wish everyone a wonderful year ahead. In this year, we should not look back to the past and always look forwards to a brighter and happier future.

Since it is a brand new year and a brand new decade, I decided to have a new website, a more professional site to maintain my designs. I do love my old blog site; however, it has its limitation and there are something that I wish my old site would do but it could not. Therefore,  I set up this new site in hoping to have a better organization to my designs and patterns.

I am on the process of moving my older blogs from my silkieknit blog site to this site. Once all the necessary post has been moved form there to here. My old blog site will be a history.

This site is still under very heavy construction so please keep tracking back. In this new year, I promise to keep my blog updated as often as possible! Also I am hoping my imagination will really run wild and design something awesome.